Preparing the Workspace


Preparing the Workspace |
|
Before you start working with CDO, you need to set up your development environment. This documentation assumes that you have a basic understanding of EMF and Java development with Eclipse and that you have an Eclipse IDE installed and configured for your applications.
The following prerequisites must be installed into the target platform of your workspace:
Make sure to include all necessary dependencies in your project's build path to avoid any runtime issues.
Note: If you are using an IDE other than Eclipse, you will need to manually download and include the required libraries in your project's build path.
At the bottom of the CDO Downloads page, you find a link to All Promoted Builds,
where you can download emf-cdo-{qualifier}-Dropins.zip archives containing all necessary libraries.
Note also that CDO and Net4j, as well as EMF, attach great importance to API and binary compatibility. Therefore, you can usually mix and match different versions of these libraries. However, it is recommended to use compatible versions to avoid any potential issues. On the CDO Downloads page mentioned above, you find version information about CDO and Net4j, as well as links to the corresponding EMF and Eclipse releases.
In the following chapter, you find information about using the Oomph Setup Engine to automate the setup of your Eclipse workspace.
In Installing the Sources, you find information about checking out the CDO sources from Git and importing them into your workspace.
The Oomph Setup Engine is a powerful tool for automating the setup of Eclipse workspaces. It allows you to define a set of provisioning tasks, such as installing plugins, configuring preferences, and setting up projects. On the Oomph Homepage, you find information about how to use the Eclipse Installer and how to author setup models.
A prerequisite for using the Oomph Setup Engine is to have the Oomph plugins installed in your Eclipse IDE. In many cases, the
Oomph plugins are already included in the Eclipse IDE packages available from the Eclipse
Downloads page. If you are using a custom Eclipse installation, you can install the Oomph plugins by adding the
Oomph update site (http://download.eclipse.org/oomph/updates/latest/) to your Eclipse installation and installing the
"Oomph Setup" feature.
Once you have installed the Oomph plugins, you can add setup tasks to the workspace.setup file or the installation.setup
file of your Eclipse IDE. You can open them via the Navigate > Open Setup sub menu of the main menu.
For CDO development, you typically want to add a TargletTask that sets up the target platform of your workspace to include the CDO SDK and its dependencies. As a convenience, CDO's build system produces a setup macro that you can reference from your setup file. To do so, you need to find the appropriate build of CDO on the CDO Downloads page. Each build is shown as follows:
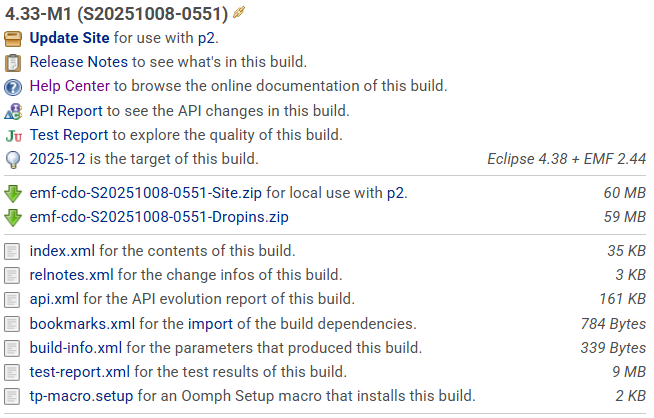
The link to the generated setup macro is the last one in the list of links below the build description. It points to a file named
tp-macro.setup. You can reference this file from your setup file as follows:
 <?xml version="1.0" encoding="UTF-8"?>
 <setup:MacroTask
     xmi:version="2.0"
     xmlns:xmi="http://www.omg.org/XMI"
     xmlns:setup="http://www.eclipse.org/oomph/setup/1.0"
     id="CDO-TP"
     macro="https://download.eclipse.org/modeling/emf/cdo/drops/S20251008-0551/tp-macro.setup#/"/>
You can copy the XML snippet above and paste it into your setup file. The Setup editor will automatically convert the XML snippet into a MacroExpansion, fetch the referenced setup macro and expand it inline as a preview.
Of course, you will need to adjust the URL to point to the version of CDO you want to use. You can then save the setup file and perform it via the Perform Setup Tasks action in the Help menu.
CDO also publishes floating versions of the setup macro. If you want to stay up to date, you can use the following URLs: